
ASSEMBLY INSTRUCTIONS
Before starting the assembly of the water reservoir, the following aspects should be taken into account:
- Support Lintel – This must respect the dimensions indicated in the manual, avoiding problems during assembly;
- Steel Storage – To prevent oxidation (white rust), you should store the sheets in a dry environment, and on a pallet, to avoid accumulations of moisture. You should also avoid being near doors and if possible keep the sheets covered;
- Assembly on windy days – Placing the sheets in the ring, the liner and the anti-algae covers must be done on days with little wind, as otherwise they present a risk to the assemblers, as well as increasing the risk of damaging the material;
- Fixing L – In high and/or windy areas, it is advisable to apply a fixing L to the lintel, thus preventing the wind from displacing the reservoir, which could damage the structure;
- Reservoir Filling – It is mandatory to fill the reservoir after its assembly, to avoid damage to the Reservoir, if the liner moves, due to the action of the wind.

Define the center of the reservoir and mark a perfect circle with the diameter of the tank, where the lintel in cement blocks will be located.


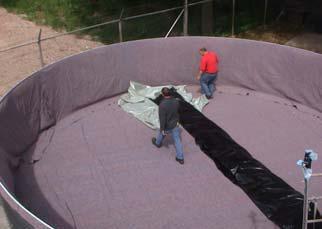
After the application of the geotextile, the lining bag is unrolled in accordance with the instructions indicated therein. In the next step, the edges of the bag must be adjusted with that of the plates, being finally placed on top at a height of 3 ribs and then strapping.

Finally, the output assembly instructions. In step 1, you must clean the surface of the PVC pipe, and then fit the witch hat. In step 2, cut the top of the witch’s hat 3-5 cm above the PVC pipe and apply PVC glue from the installation kit. In step 3, pull the outlet down so that the outlet is very tight against the PVC pipe. In steps 4 and 5, tape the connection with two types, a glue tape and a vulcanizing tape (cold).
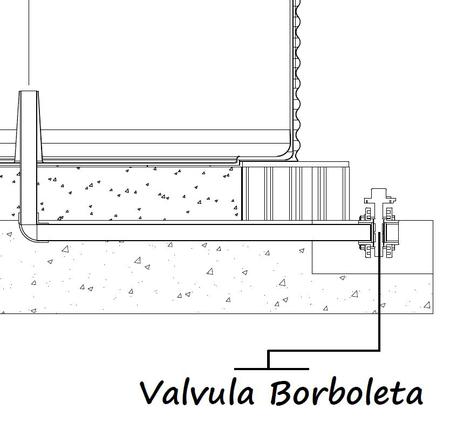
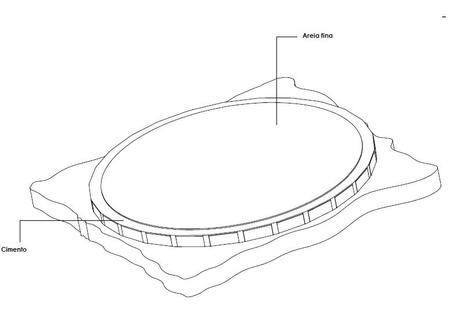
After making the lintel of cement blocks, the upper part of the lintel must be leveled so that the sheets rest perfectly. At this point, the pipe that will make the exit must be fixed, with PVC pipe of pressure PN10 or higher, together with a knee and a small section of PVC, where the exit (witch’s hat) will be fixed. Then fill the interior with fine sand, free from rough or sharp surfaces, finishing the construction of the Lintel. Start mounting the plates in a clockwise direction. The plates come on an organized pallet, where the first plates are placed first. In the upper rings, the plates must be out of contact and must be outside the lower ring. When assembling the first ring, check that the ring has a perfect circular shape. After assembling the plates, the nuts must be tightened more strongly with a drill (with a hammer). Then, a canvas in PP Geotextile is placed to protect the lining bag. The PP geotextile is secured by a profile which is in turn secured by clamps to the plates, to prevent it from coming out, when assembling the bag.
After assembling the reservoir, fill it with water to prevent the liner from moving, which could cause damage when filling.
